From today, Fido will also be able to make an important contribution to the environment by converting his kennel into an organic oasis. But how? It's simple, you just need a few materials to buy from a well-stocked hardware store and an afternoon of your time to create a green roof on your dog's kennel.
He is about to end up run over, his mother saves him
La bioarchitecture he put environmentally friendly construction techniques at our service and showed us the beauty and extreme usefulness of green roofs: thanks to them our homes are well insulated and are even able to produce oxygen, as well as being aesthetically appealing. From today, Fido will also be able to make an important contribution to the environment, converting his kennel into an organic oasis. But how?
It's simple, you just need a few materials to buy from a well-stocked hardware store and an afternoon of your time to make a green roof on your dog's bed.
Materials needed:
- Water-based impregnated (non-toxic and with zero emissions of Volatile Organic Compounds)
- 4 marine plywood slats with a thickness of 25 mm and a height of 200 mm. We will determine the length based on the size of the roof.
- Multi-purpose silicone
- 3 copper gutters 13mm wide and 50mm long
- Liquid waterproofer (non-toxic and with zero emissions of Volatile Organic Compounds)
- Roof sealant
- Water-based paint for exteriors (non-toxic and with zero emissions of Volatile Organic Compounds)
- Bamboo slats
- Waterproof case
- Non-toxic glue
- Organic soil (60% pumice, 10% horticultural sand, 30% compost)
- Easy to grow plants or herbs
- Putty from wood
Tools needed
- Brush
- Tape measure
- Sega
- 5 cm wood screws
- Wooden nails
- Silicone gun
- Wood clamps
- 1 x 13mm wide wood drill bit (for drilling copper drain holes)
- Putty knife
- Tenaglia
Spread a couple of water-soaked coats over the entire surface of the kennel. In this way in addition to waterproof it you will eliminate any possibility of noxious fumes from pretreated woods.
Phase 2
Measure with precision the perimeter of the roof and cut the marine plywood boards perfectly to size, remembering to add the thickness of the wood to the measurements obtained. ES: let's imagine we have a doghouse with a square roof measuring 400 × 400 mm. We will cut 2 strips with a length of 400 mm and another 2 with a length of 450 mm [400 + 25 + 25].)
Phase 3
With the freshly cut boards build a square around the roof. (see figure 1)
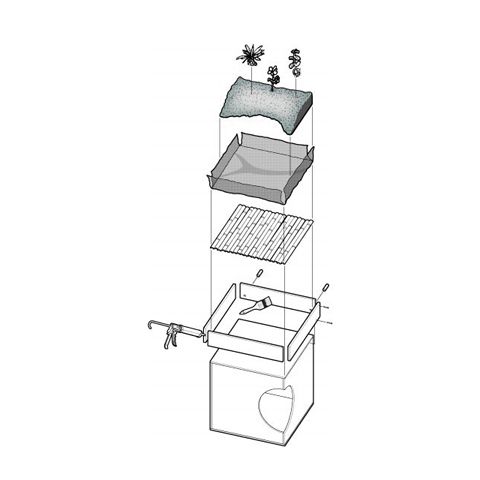
Phase 4
Fasten the wooden strips to the roof of the kennel with thin nails (leaving a part of them out to be able to remove them) so that they can be screwed together more easily. Once screwed in, you can remove the nails with a pincer.
Phase 5
Fill all the nail and screw holes and let dry.
Phase 6
Time seal the internal and external corners of the square with silicone. Help yourself with clamps to keep the corners stable and perfectly aligned. (see figure 1)
Phase 7
Drill 3 holes, with the specially prepared tip, equally distributed along the length of the strip, keeping about 20 mm from the lower edge of the same. The holes will be made on the strip corresponding to the rear side of the kennel.
Phase 8
Now insert the copper pipes for the water drain into the holes. Make sure that the externally visible part is no longer than 20 mm.
Phase 9
Apply a layer of silicone around the edges of the tube both internally and externally and allow to dry.
Phase 10
Spread a layer of roofing sealer over the base of the roof and the walls of the square and let it dry.
Phase 11
Cover the base of the roof and the inside of the square with a coat of liquid waterproofing and allow to dry.
Phase 12
Apply two coats of non-toxic outdoor paint and let it dry. Then spread another layer of impregnating agent and let it dry again.
Phase 13
Arrange, side by side, the bamboo strips previously cut to size, on the entire surface of the roof.Phase 14
Position the waterproofing sheath, properly cut, (leaving an excess almost equal to the height of the strips that make up the square) so as to cover the entire internal surface and glue it on the edges of the strips.
Phase 15
Now you can distribute the soil evenly until you reach a height of 6-8 centimeters. Wet with water and insert your plants, then wet again. We advise you to choose native plants or herbs that do not need more than 2-4 centimeters of soil to be able to grow.
Phase 16
It will take a few days for the air in the wet soil to dissolve. It may be necessary to level the substrate again by adding more potting soil.
Now Fido also owns a green “home”. Good growth everyone!
Source and images: Readymade